


A microservice architecture is all about services that invoke each other. But how do you keep that secure, making sure that only your own services can call each of your services? How do you authenticate?
You know how to do this with browser apps: The user enters credentials, the browser sends these to the service, which sends back a session token that authenticates the user for some period. But with a microservice, there is no human in the loop to enter a password or a multi-factor-authentication key.
Here I’ll describe how to do this, focusing on servers running on Google Cloud Platform services such as Cloud Run or Google Kubernetes Engine (GKE). The client services can be on GCP, on-premises, or on AWS.
What motivated me to write this article is that API Gateway and Cloud Endpoints are rapidly evolving technologies with strong authentication capabilities, but also with limitations as compared to each other and to other competing services. There are many ways to achieve authentication between microservices. I’ll start with the simplest but least secure and maintainable, and step up to recommended architectures.
To keep things clear, I’ll focus on microservices where you control both sides, but the same principles apply where the client service is external to your organization.
The basics: Headers, keys, and proxies
Though there are simpler and more complicated ways to do it, inter-service authentication needs very careful design. The basic outline is this.
- The client uses a secret key to sign a token
- The standard format for passing this is JSON Web Token
- The token goes in an HTTP Authorization header as follows
Authorization: Bearer <JWT>
where <JWT> is the base64 encoded token.
- The server validates that token by querying a service. Alternatively, a reverse proxy can receive the request, and, before passing it on to the actual server, validate the token by querying a service.
- In GCP, that service is provided by the platform.
This article will show multiple ways of doing this, starting with simple and insecure and moving up to more complete solutions.
Too simple: Self-managed “API Keys”
A basic solution, often used by those who don’t know the full set of technologies, is similar to what human users do with they login with username and password: Store a secret string to the client service, an “API Key”, that serves as a credential, then validate it on server side.
APIKEY=Microservice1:78eb9a45897f
Limitations
This is not secure.
Leaking keys
Keys leak in more ways than you can imagine.
o prevent this, you should not store secrets in a Git or other source code control — all too easy to open up by accident; instead, use a secret manager service like Google Cloud Secret Manager or Hashicorp Vault. Still, this leaves the same problem: the client service will need to store credentials to access the secret manager.
Key Management
You’ll need to develop a server-side database to store these keys, and a layer to validate that a received key is correct. You won’t want keys to leak from this layer, either, so the client should not pass the API key, just a hash, which the server checks against a stored hash of the key. Maintaining all this is costly. It is also insecure, since you are not able to put the expertise and effort into closing all possible holes. Security systems should be left to experts wherever possible.
Rotation
Because leaks are inevitable, best practice is to frequently rotate the key: Create a new one and invalidate the old one after a certain time period. This requires automating a mechanism on the client-side that requests a new key (authenticating this request with the old key!). And on server-side, you need a mechanism for generating new keys on-demand, and for invalidating the old one at a specific later date.
And this sort of thing is always more complicated than you think at first: For example, you probably want to enforce a maximum number of valid versions of a key at any one time, since having two valid versions is a necessary part of rotation but a hundred versions is a leak waiting to happen.
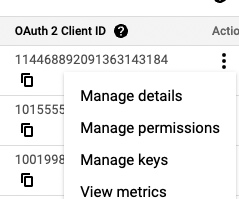
Cloud-provider service account keys
Why implement the hashing, validation, and rotation, and expiration mechanism yourself? One better is to create a service account, then download a key file from Google Cloud Identity and Access Management (IAM). You can create a key from the Service Account page.
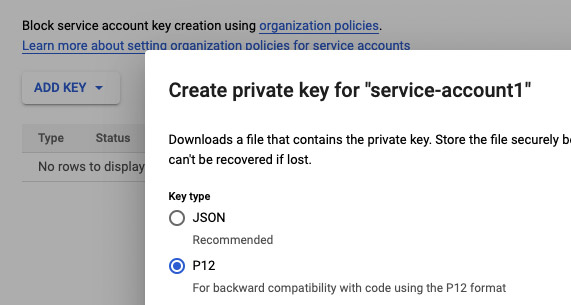
Download the JSON, and be sure to set the expiration date — a new Google Cloud feature. The JSON looks like this. (Don’t worry, I’ve thoroughly redacted the text 😁, plus I’ve already disabled the key!)
{
 "type": "service_account",
 "project_id": "myproject",
 "private_key_id": "ded9d97108b…..5cfd179e95e0e1",
 "private_key": " — — -BEGIN PRIVATE KEY — — -\nMIIEvKIBADABNBg….QDA6woGjE4Q — — -END PRIVATE KEY — — -\n",
 "client_email": "[email protected]",
 "client_id": "106482...4210366919",
 "auth_uri": "https://accounts.google.com/o/oauth2/auth",
 "token_uri": "https://oauth2.googleapis.com/token",
 "auth_provider_x509_cert_url": "https://www.googleapis.com/oauth2/v1/certs",
 "client_x509_cert_url": "https://www.googleapis.com/robot/v1/metadata/x509/kubeflowpipeline%40joshua-playground.iam.gserviceaccount.com"
}
Limitation
Sounds good, right? But (as you’ve guessed), this also is not as secure and convenient as we would like.
Just like home-made API keys, the Service Account key file can leak, and so you need to rotate it. Google helps you ensure that keys will expire, and provides APIs to call to get a new key, but you still have to use those capabilities.
Later, we will explain how to avoid having a key file at all, by baking the Service Account into your client applications. But first, let’s explain what to do with the Service Account, whether through the key file or the baked-in variety.
Authentication in application code
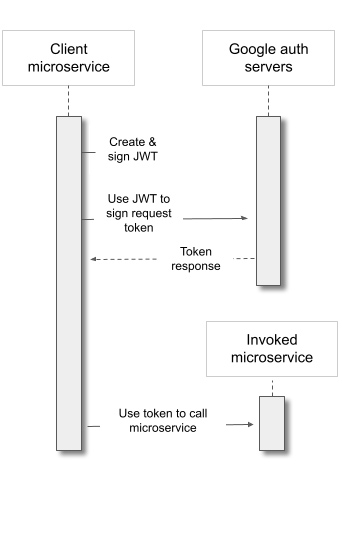
To authenticate, the client-service uses its Service Account.
You do this with OpenID Connect (OIDC), which passes signed JSON Web Tokens (JWT). These tokens are valid for only a short time — hours, not weeks — minimizing the risk from a leak.
You can do that on the level of your own code with software libraries on client and server side.
- First, the client creates and uses a software library and the Service Account key to sign an access-request JWT token.
- Then it uses that token to request a different token, an access token, from the Google authentication server. The Google authentication server checks that the Service Account indeed signed that access-request JWT, then sends back the access token certifying that fact.
- The client uses this access token to call your microservice.
- Your microservice uses a software library to check that the access token is indeed validated and signed by the Google service.
It’s similar to this flow, except that the service that is being invoked is your own microservice rather than a Google API.
Limitation
Coupling with your server
This solution involves code inside your server. Since you may have multiple microservices with the same needs, it means maintaining and ensuring the security of this authentication layer in multiple codebases.
Later, we will show how to avoid inserting this code into your application. But first, let’s see how to stop using key files at all.
Baked-in Service Accounts: GCP
If you are deploying the client service in GCP, don’t use a Service Account key. Instead, launch the service with the given Service Account baked in.
For example, with a Google Compute Engine (GCE) instance, you can use
gcloud compute instances create [INSTANCE_NAME] --service-account [SERVICE_ACCOUNT_EMAIL] ...
to specify the Service Account; and similarly for Cloud Run and other GCP services from which your client-microservice might invoke other microservices.
Now there is no worry about leaking key files, since there are none. Instead, the metadata server generates a signed instance token verifying the service account identity. (And the request to the metadata server never leaves the physical instance where the VM is running.)
On Kubernetes
Kubernetes has its own system of service accounts that participate in a system of authentication specific to Kubernetes. This is separate from the GCP IAM layer, so if your client service is on Google Kubernetes Engine, use Workload Identity to assign a GCP IAM Service Account to your Kubernetes layer. Workload Identity transparently intercepts and proxies all calls from GKE to GCP APIs and enriches them with the access token.
If your client is on AWS’s Elastic Kubernetes Service, you can also assign an IAM role to participate in GCP flows, as in the next section.
Baked-in roles: AWS and Workload Identity Federation
If the client service is in AWS, you can’t launch it with a GCP Service Account, but you can launch it with AWS’s variant, the Role. You launch your Lambda with an execution role, or your EC2 instance with a role (wrapped in an “Instance Profile”.)
GCP can’t trust that role directly, so you use Workload Identity Federation (WIF) to bridge AWS and GCP (article).
Here, the flow is as follows:
- First, the client service on AWS uses its role to sign a token (token 1).
- It uses token 1 to request another one (token 2) signed by AWS IAM.
- It uses token 2 to ask GCP WIF to sign an access token (token 3). Google WIF has been preconfigured to trust the given AWS role, and now that AWS has certified that the request is from the role, WIF signs and sends back the access token (token 3).
- The client service now uses token 3 just as a GCP-based client service would use an access token; the flow continues in the same way from here.
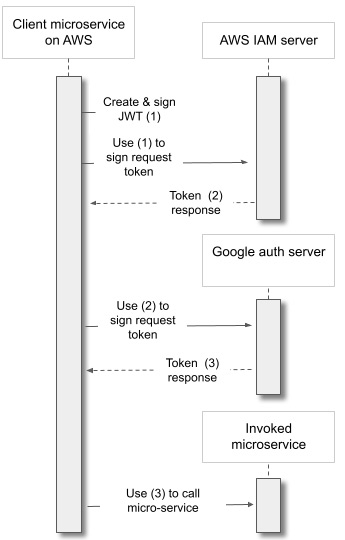
Seems complicated, but it allows you to avoid sending those secret and eminently leakable strings all over the internet — in this case, to another cloud.
Authenticating from Google to an AWS workload
This article is mostly about services running on Google, but gtoken deserves a brief mention here. This does the inverse of Workload Identity Federation: It authenticates a GKE workload to query AWS APIs by giving a temporary AWS identity to the invocation.
Authentication Proxy: API Gateway
Still, as mentioned earlier, we are limited by the fact that your own application code is performing the final step, validation that the signature is really from the Google-authorized principal. It’s better to use proven, productized systems created by security experts, wherever possible.
So, take a look at API Gateway for a robust, configurable service-to-service authentication layer that you don’t have to maintain.
This works as a proxy. It exposes a public address, standing between the client and your serverless service on Cloud Run, Cloud Functions, and App Engine. It handles the work of receiving the token and invoking Google services to authenticate the request, before passing on the request to your serverless backend. To secure the link from the API Gateway to the backend, Google inserts a special header that it controls and no attacker can add.
Limitation
However, API Gateway does not work with GKE, as it is tightly integrated with the interfaces exposed by Google-managed serverless services.
Authentication Proxy: Cloud Endpoint
So, how do you authenticate for GKE, still securing the link from the authentication layer to your backend service? For that, you use Extensible Service Proxy with Google Cloud Endpoints: A somewhat older service that API Gateway was based on, and extends.
ESP (now at v2) is a container that exposes a public address and authenticates requests. To use it for GKE, deploy it as a pod into your cluster. (By the way, though the documentation says that only the newer VPC-native/IP alias clusters are supported, it works with the earlier routes-based clusters as well.)
The link between ESPv2 and your Kubernetes services inside the cluster also needs to be secured. You can do this on the cluster networking layer by not exposing any public addresses except the ESP, or you can use more sophisticated solutions like mutual TLS or Istio Security.
For even more security, deploy ESPv2 as a sidecar, so that the proxy and your application (Kubernetes Deployment) live together in the secure “localhost” space of a pod. (Though this is not the primary deployment mode for ESPv2, it is supported in this YAML recipe shared on the official Google Cloud GitHub account.)
Wrapping up: Secure your microservices!
You can’t let just anyone invoke your APIs. This used to be solved with network boundaries, or in the cloud, with VPCs. But modern architectures support integration across cloud accounts, between cloud providers, and with non-cloud systems. And even in the VPC, you want another layer of security targeted exactly at the specific client-to-server link: Each endpoint has to trust the other.
To do it, the challenge is:
- Authenticate without having sensitive files hanging around where they can leak.
- Delegate authentication to trusted services; don’t couple authentication with application level code.
In this article, I’ve described a few ways to get that done, gradually adding security and maintainability, but also requiring knowledge in more technologies. Learning these is well worth the investment — far less expensive than falling victim to a hack!