


Welcome to Part 2 of Global-Scale Scientific Cloud Computing with Kubernetes and Terraform. Herein I share a comprehensive demo of global-scale scientific cloud computing with Kubernetes and Terraform. If you would like to refresh your memory or read more about modern DevOps principles and concepts, hop over to Part 1 of this series.
This guide will show you how DevOps, Containers, Kubernetes, and Terraform can be used in real-world deployment of computing workloads.
Overview
At a high level, the working example code:
- Shows how to put common bioinformatics tools (FastQC and BWA) into container images and upload them to each cloud’s image repository
- Spins up (and enables rapid tear-down of) all the cloud infrastructure required to run workloads via Terraform, an Infrastructure as Code tool
- Deploys a common workflow pipeline based on these images and spun up cloud infrastructure to each cloud’s fully-managed Kubernetes service, a container execution management and orchestration system. Argo will be used to orchestrate a workflow or pipeline of tasks on a Kubernetes cluster
By using Docker, Terraform, Kubernetes, and Argo together, you’ll learn to:
- Spin up, update, and tear down the infrastructure required to run your workloads with simple commands
- Run end-to-end analytical DAG-directed workloads with automated retries of individual steps, should they encounter unexpected errors or infrastructure failures
- Centralize workload logging and metrics monitoring into cloud-native log and metric exploration tooling
- Run workloads on infrastructure that will automatically scale up (to global-scale capability) and down (too little or no compute resources) as needed so that you only pay for the CPU/RAM/storage resources that are required to complete your tasks. Gone are the days of leaving servers running idle and running up your bill needlessly
- Seamlessly deploy new software versions and phase out old version usage
Code Walkthrough
With a basic understanding of DevOps under our belt, let’s look at how the code base paired with this post demonstrates core DevOps principles. This walkthrough will showcase how to build the infrastructure for supporting global-scale capable scientific pipeline execution. Specifically, we will run components of a common bioinformatics pipeline.
We want to:
- Produce reports on a pair of raw genome sequencing data files that help validate they are of high quality. Raw sequencing data is stored in FASTQ format, and QC checks are performed with a tool called FastQC.
- Once those reports are produced, engage in a process known as alignment, which ultimately would (through additional downstream tool processing) enable mutation discovery. This is done with a tool called bwa-mem2.
This means we want our Kubernetes-based pipeline to execute two FastQC containers on a pair of FASTQ sequencing data files simultaneously, then if those tasks both succeed, runs bwa-mem2 alignment of the pair of raw sequencing datasets against the latest version of the human genome known as hg38. Both FastQC reports and the alignment file produced by BWA, known as a BAM file, will be uploaded to a bucket for long-term storage.
Heads Up On Cost
Since this code base will walk you through a real analytical use case and not a simple example, there is an expectation that the compute environment set up will have a non-trivial cost. Depending on how long you leave the Terraform infrastructure running, I would generally anticipate spending double-digit dollars on your cloud bill.
Step 0: Install local clients: Cloud CLI, Terraform and kubectl
Make sure your local cloud CLI tool is installed locally and authenticated against the account you will be using. CLI links: GCP and AWS. Spinning up cloud infrastructure-as-code is as simple as navigating to a folder of YAML Terraform files and running:
terraform apply -auto-approve
For that to work, you will need to install the terraform client locally. Terraform will automatically make use of your cloud CLI auth credentials.
Running a job or a workflow on Kubernetes is as simple as creating the YAML template for that job/workflow and running:
kubectl create -f job.yaml
For that to work, you will need to install the kubectl client locally. Kubectl will be authenticated with a cloud-specific CLI command.
Step 1: Acquire FASTQ and Human Reference (hg38) Data
Before we can begin demonstrating this workflow, you will need an example FASTQ file pair and the hg38 human reference genome to work with.
In order to keep processing costs to a minimum while still using real-world use case scale data, I pulled two ~0.5 GB FASTQ files for the ‘gold standard’ sample NA12878 from the 1000 Genomes project’s S3 bucket. I highly recommend creating a GCS or S3 bucket in your cloud account and copying these files over to it. As you test the workflow repeatedly, you may not want to repeatedly pull from the 1000G S3 bucket.
You should always be mindful of cross-region data transfer pricing.
The FASTQ files are located in Amazon’s us-east-1 region, and so movement of this data to another regional S3 bucket (e.g. the us-west-2 region used in my testing) or out of the AWS cloud and into a GCP Cloud Storage bucket will come with a cost with every GB of data transferred out of the bucket’s region. Create a bucket in your desired cloud region and copy the FASTQs over to it:
# R1 FASTQ located in a us-east-1 S3 bucket
s3://1000genomes/phase3/data/NA12878/sequence_read/ERR001268_1.filt.fastq.gz
# R2 FASTQ located in a us-east-1 S3 bucket
s3://1000genomes/phase3/data/NA12878/sequence_read/ERR001268_2.filt.fastq.gz
# Example command for copying an object:
YOUR_FASTQ_BUCKET=<BUCKET_NAME_HERE>
# For AWS, use:
aws s3 cp s3://1000genomes/phase3/data/NA12878/sequence_read/ERR001268_1.filt.fastq.gz s3://{YOUR_FASTQ_BUCKET}/FASTQ/
# For GCP, copy the file to a VM's local storage with 'aws s3 cp'
# Then, copy from local storage to a GCS bucket with gsutil:
gsutil -o GSUtil:parallel_composite_upload_threshold=150M cp /tmp/FASTQ/ERR001268_1.filt.fastq.gz gs://{YOUR_FASTQ_BUCKET}/FASTQ/
You will also need to grab the latest human reference genome and build a bwa-mem2 index for it. I recommend:
- Copying the hg38 FASTA from the Broad Institute’s us-east-1 S3 bucket to a very high memory VM in your choice of cloud. This could be an r5.16xlarge machine on AWS or an n2-highmem-64 machine on GCP.
- Installing bwa-mem2 (or use the container image described later)
- Building the bwa-mem2 reference index (this takes 1–2 hours)
- Uploading the output files into a new bucket in your cloud account
# hg38 reference genome from the Broad Institute located in a us-east-1 S3 bucket
s3://broad-references/hg38/v0/Homo_sapiens_assembly38.fasta
# Example command for building the bwa-mem2 index and saving it to your bucket
YOUR_REF_BUCKET=<BUCKET_NAME_HERE>
# For both AWS and GCP, use:
aws s3 cp s3://broad-references/hg38/v0/Homo_sapiens_assembly38.fasta /tmp/reference/hg38.fasta
bwa-mem2 index -p hg38 /tmp/reference/hg38.fasta
# For AWS, use:
aws s3 sync /tmp/reference/ s3://${YOUR_REF_BUCKET}/hg38/
# For GCP, use:
gsutil -m -o GSUtil:parallel_composite_upload_threshold=150M cp "/tmp/reference/hg38*" gs://${YOUR_REF_BUCKET}/hg38/
If you followed the above steps correctly, you will now have two FASTQs (raw genome sequencing data) and the hg38 human reference genome ready for use in bioinformatics workflow testing.
Step 2: Build Out Your Cloud Infrastructure
Using Terraform, we will spin up all the cloud infrastructure required to run a fully-managed Kubernetes cluster, as well as execute a few commands on the cluster (via kubectl) that install argo on the cluster, a Kubernetes tool for running workflows (e.g., bioinformatics pipelines).
Terraform maintains its known cloud infrastructure state locally by default, however in a real-world use case, you utilize a bucket as the Terraform backend, that way when individuals in a company make an infrastructure change, everyone operates from the same, up-to-date ‘truth’ dataset of what that infrastructure state looks like.
Using a bucket as a backend will also lock out infrastructure changes when one set of changes is still being applied, thus preventing multiple, potentially conflicting terraform application operations from being executed at the same time. In order to add support for a bucket-based Terraform backend, create a bucket in your cloud environment, then search and replace all references in the code base to doit-matt-tf-state-test to your bucket name.
With a Terraform backend bucket ready, you can now spin up infrastructure.
If you are looking to run your workload on Google Cloud, navigate to GCP/terraform. Within this folder, there are sub-folders labeled standard and autopilot, each containing TF code that will launch a GKE cluster using GKE Standard or Autopilot mode. Autopilot is generally the preferred option, as it not only moves nodes (compute resources) towards a serverless model but also enforces usage of a multitude of security best practices.
Unfortunately, Autopilot will not work in this demo because of a limitation: ephemeral disk space is limited to 10 GiBs, which is not sufficient to run FastQC nor bwa-mem2 on real-world data. However, should this limitation be removed in the future, usage of Autopilot over Standard is encouraged. I have TF code for Autopilot just in case this limitation is raised post-publication. AWS ECS Fargate also comes with a 200 GiB disk space limitation which is not sufficient for most real-world scientific computing uses. Fargate TF code is not covered in the code repository.
If you are looking to run your workload on AWS, navigate to AWS/terraform.
Once in your cloud-specific terraform folder, run the following:
terraform apply -auto-approve
# Run 'terraform plan' first to see the list of planned infrastructure changes without creating anything
This will plan and then immediately execute on the set of terraform ‘.tf’ files present in the folder to spin up a K8s cluster and its prerequisite resources. Terraform will ask for a GCP Project ID or an AWS Account ID, and that’s it.
You can optionally edit the variables.tf file prior to running apply if you wish to change the region the cluster will launch in, the name of the cluster, if you want to hardcode the GCP project/AWS account ID variable, etc.
I strongly encourage you to review the code in order to learn Terraform
To accelerate your understanding, the following are created for GCP:
- Enablement of the Compute, Container, and IAM APIs
- An auto-scaling GKE Standard cluster within the default VPC using the default, up-to-date Kubernetes version (v1.20 at the time of publication) with a few optional best-practices security features enabled such as Workload Identity, Shielded Nodes, and Secure Boot. It is a regional cluster with nodes spread across multiple zones (data centers)
- A GCP Service Account (SA) and its linked Kubernetes Service Account (KSA) that enable Workload Identity to limit the GCP permission scope for all jobs run within a certain Kubernetes namespace. The SA/KSA will be allowed to read/write to buckets, and to write various logs and metrics to Cloud Logging and Cloud Metrics
- The cluster makes use of preemptible / spot instances. You will pay significantly less than the on-demand price, with the potential for nodes to unexpectedly drop out and eventually be replaced. K8s will automatically identify failed jobs due to sudden node termination and reschedule them
For AWS, the following networking and security components are created:
- A new VPC dedicated to housing the K8s cluster
- Public (unused) and private subnets + route tables for cluster nodes
- A NAT Gateway, S3 and ECR VPC endpoints and their associated TLS-enabling security groups, and enablement of DNS hostname support in order to support a private node cluster
- An Internet Gateway to enable public access to the cluster control plane
For AWS, you will also need to navigate to AWS/terraform/ecr and run terraform apply again, as this folder’s .tf files create:
- The repositories where container images you create will be stored
(The repositories do not have to be created on GCP)
For AWS, you will also need to navigate to AWS/terraform/eks and run terraform apply again, as this folder’s .tf files create:
- An IAM role for the cluster enabling read and write access to S3 buckets, as well as browser-based, key-less SSH into nodes via SSM Manager
- An auto-scaling EKS cluster using the default, up-to-date Kubernetes version (v1.21 at the time of publication). Workload Identity, Shielded Nodes, and Secure Boot are not readily available features on EKS. It is a regional cluster with nodes spread across multiple zones (data centers)
- The cluster makes use of preemptible / spot instances. You will pay significantly less than the on-demand price, with the potential for nodes to unexpectedly drop out and eventually be replaced. K8s will automatically identify failed jobs due to sudden node termination and reschedule them
Once the terraform apply operation(s) have completed, your cluster is operational and is ready for you to issue Kubernetes API commands against it using kubectl. Simply authenticate kubectl with a cloud-specific command:
# For GCP:
gcloud container clusters get-credentials --region=us-central1 bioinformatics-tasks
# For AWS:
aws eks update-kubeconfig --name=bioinformatics-tasks
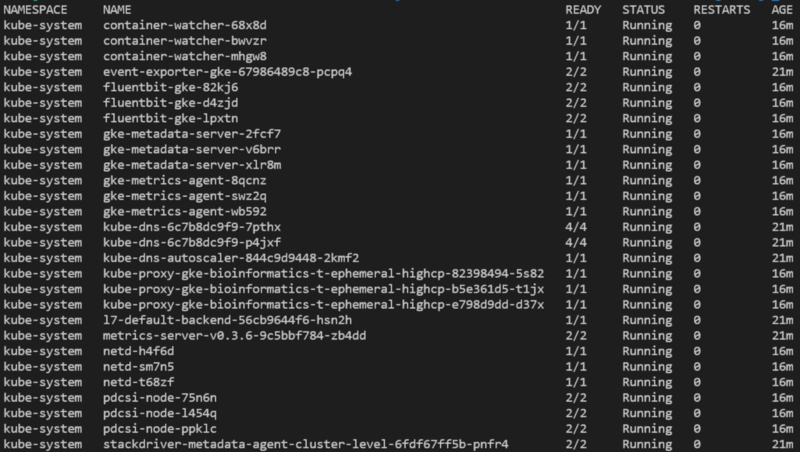
You will now be able to run various commands against the cluster, such as listing pods deployed in all namespaces with kubectl get pods -A:
With the cluster spun up, we now need to install argo on the cluster, as it will enable us to submit not just individual tasks but a DAG-directed workflow / pipeline of tasks.
To do this on GCP, navigate to GCP/terraform/standard/kubectl_commands
To do this on AWS, navigate to AWS/terraform/kubectl_commands
Running terraform apply -auto-approve in these folders will run Terraform-managed kubectl commands that:
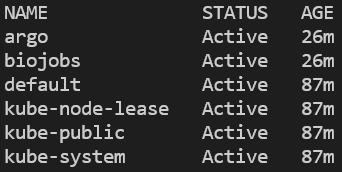
- Create a ‘biojobs’ namespace to which jobs will be submitted and (on GCP) limited in permissions scope to only read/write objects from a bucket.
- Install argo and, for GCP with its Workload Identity, give it appropriately scoped permissions to monitor pod progress in the ‘biojobs’ namespace.
You can verify that the namespace was created and argo installed by listing all namespaces, then querying for pods running in the argo namespace:
kubectl get ns
kubectl get pods -n argo

Lastly, run this command to make sure argo plays nicely with Kubernetes’ ≥v1.19 switch from using docker as the container runtime to containerd. Don’t worry about this detail as argo will fix this issue eventually:
kubectl patch configmap workflow-controller-configmap -n argo --patch ‘{“data”:{“containerRuntimeExecutor”:”k8sapi”}}’
With argo installed and compute nodes ready to go, let’s get creative!
Step 3: Build FastQC and bwa-mem2 Container Images
In order to run FastQC and bwa-mem2 workloads in AWS or GCP, we will need to build container images for these tools and store them in your respective cloud’s container image repository (GCR for GCP, ECR for AWS).
Navigate to images/fastqc/
Inside this folder is the Dockerfile defining how to package FastQC into a container along with s5cmd (a tool for fast AWS S3 ←→local copies) and gsutil (for GCS ←→local copies). Take some time reviewing the file’s contents and reading up on how Dockerfiles are constructed. Tangentially, you may be interested in this article I wrote on maximizing bucket data transfer speeds, as principles from that articles are utilized in the Dockerfile.
Run build_fastqc_image_gcp.sh or build_fastqc_image_aws.sh to create a container image from the Dockerfile, then push it to GCR or ECR, respectively.
To create a container image for bwa-mem and store it in GCR or ECR, navigate to images/bwa-mem2/ and repeat the same build script execution process.
With this step complete, you now have FastQC and bwa-mem2 available for execution on a Kubernetes cluster via the container images stored in your cloud environment’s image repository.
Step 4: Submit and Monitor Kubernetes Jobs
Next, we will navigate to your cloud-specific folder for Kubernetes jobs and launch a few. We will eventually run FastQC and bwa-mem2 in a pipeline with argo, but to start, we will run these tasks individually.
For GCP, navigate to GCP/gke/FastQC/
For AWS, navigate to AWS/eks/FastQC/
Within these folders is a Kubernetes Job titled fastqc.yaml.
This YAML defines a job that can be run with kubectl create -f fastqc.yaml. However, the file contains a few variables which should be defined within and replaced by run_fastqc_job.sh. Take some time to understand Kubernetes objects in general and jobs specifically to decipher fastqc.yaml, and additionally review what is taking place in the shell script.
Essentially, Kubernetes is more often used to run long-running pods called Deployments (e.g., long-lived web servers), but it can also run Jobs, or one-time execution tasks, such as scientific programs like FastQC. Throughout the code base, we will be submitting Kubernetes Job objects to the cluster.
Provide the variables INPUT_FILEPATH and OUTPUT_FILEPATH to the shell script, and it will launch a FastQC job using one of the FASTQ files you grabbed earlier, ultimately saving the zipped up report to a bucket. Alternatively, you could replace variables in the fastqc.yaml file manually and run the job with: kubectl create -f fastqc.yaml
Keep track of FastQC progress with: kubectl get pods -n biojobs
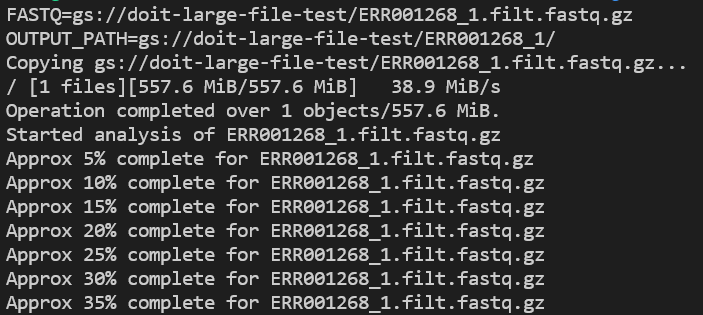
You’ll notice that a single pod is launched, which begins by pulling down the container image, then shortly thereafter runs the specified job:


Check application logs as it runs with kubectl logs -n biojobs <pod_name>:
Because containers — and GKE/EKS — are built with monitoring in mind, you can easily locate these log entries in your cloud’s native logging solution, enabling long-term log retention and investigative capabilities.
Use the phrase complete for within GCP’s Cloud Logging or AWS’ CloudWatch to locate FastQC pod log entries:
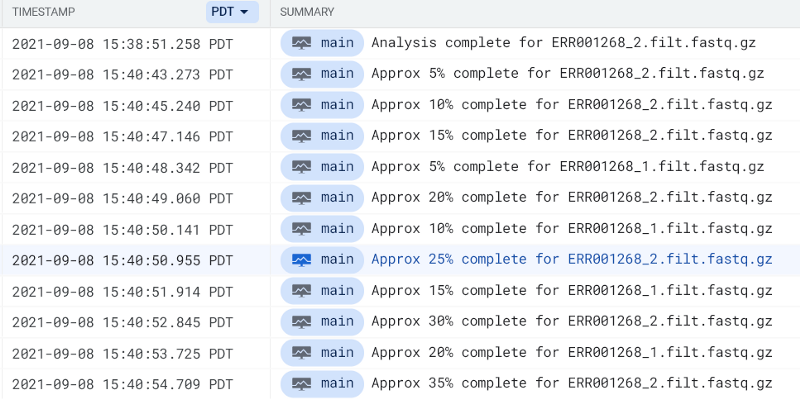
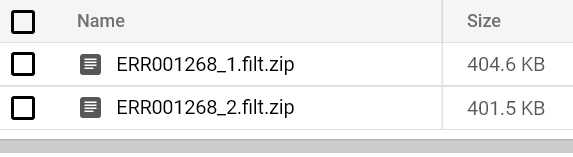
You should eventually see a FastQC report hit your output bucket path. Try running FastQC pods for both FASTQ files until you see their reports:
That’s all there is to running FastQC at scale on Kubernetes!
You could launch one FastQC job or ten thousand at once. The Kubernetes control plane, along with its cloud environment’s associated compute node auto-scaling service, will increase and decrease compute capacity as required to meet workload demands as specified in the cpu/memory/disk requirements defined in the FastQC’s Kubernetes Object YAML file.
Just make sure your cluster autoscaler’s maximum permitted values for node count / cpu / memory are high enough — or at least where you want them for cost control purposes — on cluster creation. (GCP: gke.tf AWS: cluster.tf)
You can run bwa-mem2 cost-effectively at scale with a similar level of ease!
For GCP, navigate to GCP/gke/bwa-mem2/
For AWS, navigate to AWS/eks/bwa-mem2/
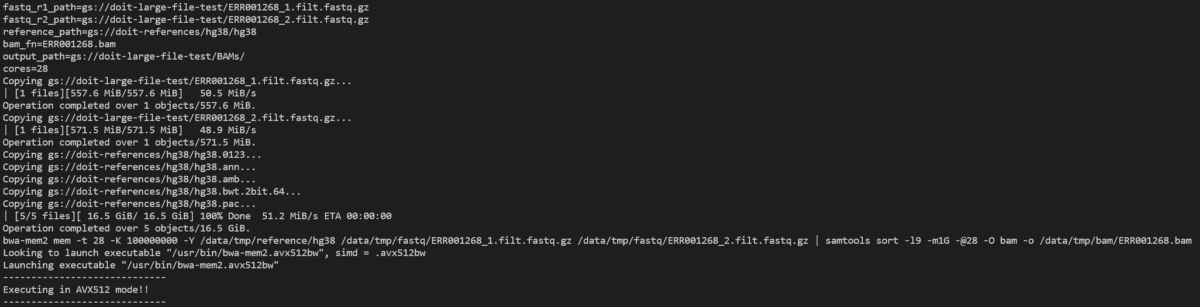
Provide input/output paths for variables at the top of run_bwa-mem2_job.sh and those will substitute variable names in bwa-mem2.yaml, then submit the Job to your cluster.
Continue to monitor pod status and logs until you see a BAM file output to your output bucket path:

If you check out the CPU utilization metrics for the GCE / EC2 nodes powering your cluster, you will notice that the low-intensity, single-core FastQC jobs are submitted to smaller CPU machines, while all-core-utilizing BWA jobs are submitted to high CPU machines. These correspond to the low/high CPU Kubernetes node groups created in order to ensure appropriately sized machines powering each drastically different workload will auto-scale up and down cost-effectively.
For example, on AWS it wouldn’t make sense to provision a 96 vCPU m5.24xlarge machine when scaling up just to run a new single-core FastQC job, so we instead submit FastQC to a node group possessing 4 vCPU m5.xlarge machines. Meanwhile, bwa requires as many cores as you can throw at it, so we submit those jobs to the 96 vCPU node group, which will scale independently of the 4 vCPU (FastQC) node group.
For those of you who have built secondary analysis workflows that take raw sequencing data and process it to discover variants, you are likely beginning to see the power of Kubernetes now. Gone are the days of:
- On-prem job schedulers with finicky performance at-scale
- Worrying about whether launching too many jobs at once will bring down the job scheduler, or even the cluster itself powering your (and all others) workloads.
- Ticking off your co-workers as you take on-prem compute capacity away from workloads they want to run.
- Having to monitor and relaunch workloads that fail for unexpected but recoverable reasons.
- Pulling your hair out trying to uncover log files from crashed jobs — oftentimes for applications without well-implemented log functionality.
Now, if only you didn’t have to write spaghetti code pipelining steps together…
Step 5: Submit Argo Workflows (Pipelines Kubernetes Jobs)
Argo enables you to pipeline jobs together in a way that remains operational at scale and supports both job and pipeline retries on unexpected failures.
Let’s demonstrate how to use argo to run two FastQC pods simultaneously. Then, if and only if those two pods complete successfully does alignment with bwa-mem2, then launch using the same FASTQ pair.
(As a personal exercise: You might consider adding a pass/no-pass step to the FastQC image such that if the FASTQ is of sufficiently low quality that it isn’t worth running alignment on, the BWA step in this argo workflow is skipped.)
For GCP, navigate to GCP/gke/argo_workflow/
For AWS, navigate to AWS/eks/argo_workflow/
Provide input/output paths for variables at the top of run_fastqc_to_bwa.sh and those will substitute variable names in fastqc_to_bwa.yaml, then submit the Job to your cluster.
Continually run kubectl get pods -n biojobs and you will see the FastQC pods run, then complete, followed by the launch of a BWA job:

…

Let’s take a look at the bwa-mem2 pod with:
kubectl logs -n biojobs <pod_name> main
(Note that ‘main’ has been added after the pod name. With argo, there are ‘main’ and ‘wait’ pod logs for each job in a workflow.)
You can run kubectl get wf -n biojobs to monitor argo workflow progress:

Eventually, when BWA completes, the workflow will have completed, and you will find a pair of FastQC reports and a BAM sitting in your output bucket.
Step 6: Cleaning Up
We’ve spun up some fairly pricey compute infrastructure to power BWA; we don’t want this GKE/EKS cluster hanging around when it’s not in use.
Simply navigate in reverse order through the Terraform folders and run:
terraform destroy -auto-approve
Note that this will not remove the buckets you manually created to act as Terraform’s backend and for storing the FASTQ and reference files. Terraform is only aware of and able to monitor changes to resources it has spun up. On GCP, you will also need to manually delete the container images in GCR.
For GCP, this means running the destroy command in this order:
GCP/terraform/standard/kubectl_commands/
GCP/terraform/standard/
For AWS, this means running the destroy command in this order:
AWS/terraform/eks/kubectl_commands/
AWS/terraform/eks/
AWS/terraform/ecr/ (if you want to delete the image repositories)
AWS/terraform/
Step 7: Next Steps
With the skills learned up to this point, you can build pipelines of arbitrary complexity reliant on any application, as any program can be containerized.
With versioned container image code, version-tagged containers, versioned infrastructure and argo pipelines, you can deploy new software and pipeline versions, deprecate old versions and rollback during a faulty deployment, with relative ease — at least compared to the alternative solutions — should you continue this learning path.
It’s up to you to determine what the next steps are, but I hope I have left you with the core skills required for modern, scalable scientific computing.
Summary
Best practices can only get you so far in the cloud. Building for high availability, resilience to failure, and cost-optimized scalability is extremely challenging today. These additional engineering chores add to the ever-growing workload pile, something that directly impacts productivity.
As a scientist in the 21st century it is essential to build applications with scalability and ease of deployment in mind. Not doing so only creates headaches for your organization. In the long run, these issues will snowball into serious and never-ending production issues.
If you find yourself inspired by this project, but also a little overwhelmed, do reach out to DoiT International. You can also message me on LinkedIn.
DoiT prides itself in guiding customers towards cost-optimized, scalable, highly available, resilient, and big-data scale capable cloud architectures, a service offered literally free of charge. We were awarded Google Cloud’s 2020 Global Reseller Partner of the Year award for good reason.
We have achieved Amazon’s Partner Network (APN) Certification Distinction while remaining an AWS Advanced Consulting Partner, thanks to top tier engineering talent and strong customer support. All info is communicated to you on-demand to answer cloud-oriented questions or solve ongoing issues.
Thanks a lot for your time. I hope these two articles have helped improved your skill set. Scaling up? Reach out and let us help you achieve your goals.
Thanks for reading! To stay connected, follow us on the DoiT Engineering Blog, DoiT Linkedin Channel, and DoiT Twitter Channel. To explore career opportunities, visit https://careers.doit.com.